YencaP Developer Guide
- YencaP software design
- How to XML Schema
- How to XML with Python
- How to cook YencaP Modules
- How to cook YencaP Operations
YencaP software design
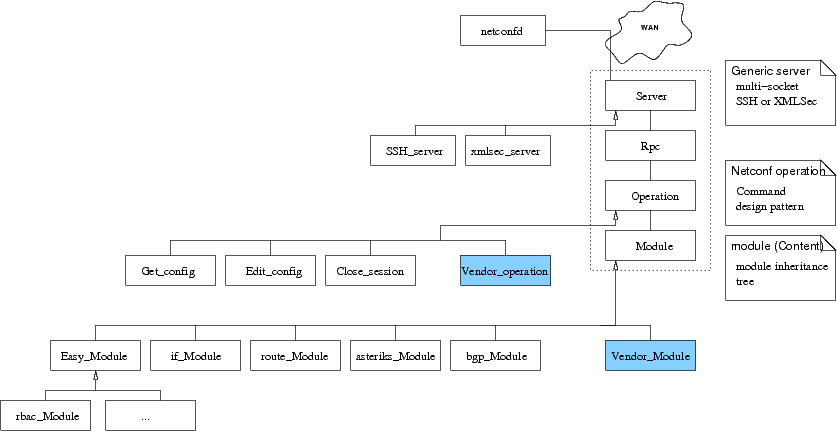
YencaP class diagram
YencaP design follows the layered architecture of the Netconf configuration protocol. It intends to be as modular as possible to allow people to add new capabilities, new operations and extend the data model. To attain this level of modularity, it makes use of the well-known Design Patterns:
- Command
- Singleton
- Facade
- Composite
YencaP is extensible in three of the four layers of Netconf:
- Server which is the transport protocol layer and can be extended to SSH, BEEP or SOAP or other experimental protocol
- Operation (or Command) which is extended to Get_Config, Edit_Config, Lock_Config and so on
- Module which is the Content layer and can be extended to provide new management data
The major advantage of this flexible architecture is that it allows to add new modules without any change to the code of the YencaP core stack. This is not always true but in a great majority of the cases, it is. Particularly with modules!
YencaP configuration cache
YencaP uses a cache mostly to exploit the XPath capability. When receiving an XPath request, it is sometimes hard to find the concerned modules because of relative expressions and also the axes which can be very complex (ancestor, childs, and so on). So a cache is maintained according to a cache lifetime specific to each module. A cache makes it very easy to apply XPath requests to the configuration tree. While it consumes more memory, it allows to improve the response time.
An improvement that we will do is to discard data from memory as soon as it is out-of-date. When getting a request, YencaP will restore or refresh the cache.
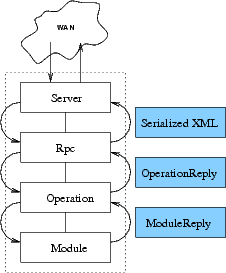
Interfaces between layers
YencaP uses well-defined interfaces to cummunicate between layers. For example, YencaP defines a ModuleReply class that allows each module to send a standard reply to the Operation layer. The reply can be an error, an ok or configuration data.
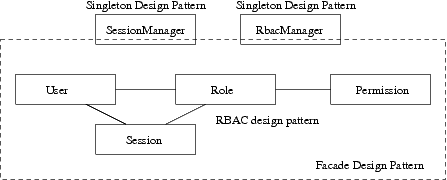
YencaP sessions and access control
YencaP enforces a Role-Based Access Control policy. This fits very well with the session-based Netconf protocol. An RBAC session is overlapping with a Netconf session. YencaP that roles be activated in order to be granted some privileges. To do that, we have defined a new capability to remotely activate or deactivate roles. YencaP stores an XML-based RBAC policy that defines a set of users, roles, permissions and the relationships between each others.
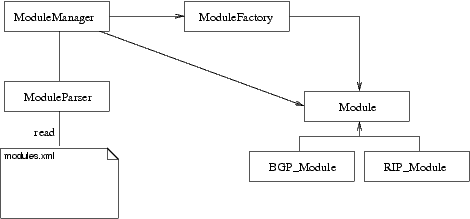
Yencap module management and lifecycle
Module management
The whole module architecture now looks like an OSGI architecture. It is possible to deploy new modules through Netconf itself, install them and load them into YencaP without shutting down the agent. Modules are hot-pluggable.
The UML diagram of the YencaP module management process looks like this: the ModuleReader (formerly ModuleParser) is responsible for reading the modules.xml file. It supports remove and add features. The ModuleReader is a singleton. ModuleFactory follows the Factory design pattern. It is capable to create (make a new instance of) a new module from its name. ModuleFactory is also a singleton. The ModuleManager is responsible for storing the instances of the modules and for loading/unloading them.
The following figure shows a sequence diagram showing how these classes interact.
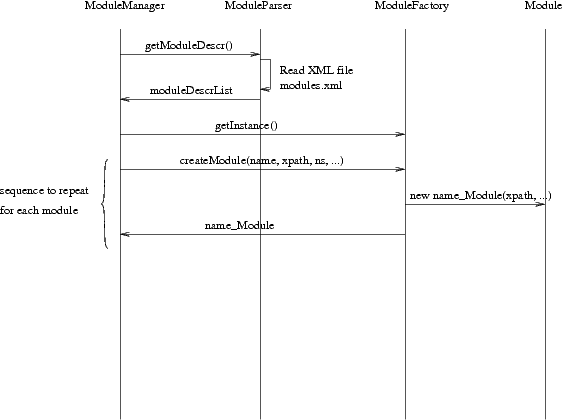
Module lifecycle
Module deployement
We defined a new operation, manage-mib-modules, for remote module management. This operation has four features:
- deploy
- undeploy
- load
- unload
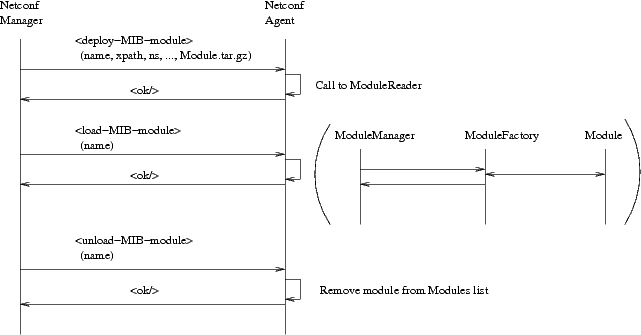
A short description of the features:
- Deploy the sources of a whole YencaP module into a Netconf agent. Example with Foo module:
<manage-mib-modules>
  <deploy>
    <name>Foo</name>
    <xpath>/ycp:netconf/f:foo</xpath>
    <namespace>urn:netconf:foo:1.0</namespace>
    <cachelifetime>150</cachelifetime>
    <parameters/>
    <file>.....source file foo.zip......</file>
  </deploy>
</manage-mib-modules>
|
- Undeploy the sources of a whole YencaP module of a Netconf agent. The module sources are removed. This operation requires the module to be unloaded. Example with Foo module:
<manage-mib-modules>
  <undeploy>
    <name>Foo</name>
  </undeploy>
</manage-mib-modules>
|
Module activation
- Load a module of a Netconf agent. Example with Foo module:
<manage-mib-modules>
  <load>
    <name>Foo</name>
  </load>
</manage-mib-modules>
|
- Unload a module of a Netconf agent. Example with Foo module:
<manage-mib-modules>
  <unload>
    <name>Foo</name>
  </unload>
</manage-mib-modules>
|
How to XML Schema
Introduction
This page is ment to be a help to understand and build XML schemas from scratch. XML schema language is a technology that makes it possible to describe very carefully the structure of a class of XML documents. It is very useful for interoperability between different applications. As soon as two parties agree on a common syntax, they can build their own proprietary applications while still maintain interoperability.
In most cases, XML documents are a flat representation of objects (in the sense of Object-Oriented Programming). Therefore, creating an XML schema is more or less, the same job as building an UML diagram. A good practice is to first describe the objects that one wants to represent, with an UML diagram. For most people, a diagram is easier to understand than an XML schema. Then, it is pretty easy to derive an XML schemas from this diagram (automatically or manually). This tutorial follows this idea.
Let's see XML schemas in action
Let's consider the following scenario: we are the French tennis federation and we want to build an XML structure to store information related to tennis players and tennis clubs. Here is the specification:
- a tennis player has a firstname, lastname, a birthday, a ranking, a personal address and a doctor certifying that he is allowed to practice sports (just in case). Also, a player belongs to a club.
- a tennis club has a name and an address.
Like in many projects, we would like to reuse the work done in a previous project. In that previous project, we defined how a regular person and an address are specified. This was done in an XML schema already.
So what is a namespace ?
A namespace is a statement that links a set of XML elements together in a naming domain. It is useful when:
- elements of different origin are used together in the same document
- people chose the same names for their XML data but with different meaning and structure
More precisely, it helps to disambiguate the elements.
Object reusability also works for XML schema
Here is the UML diagram showing the structure and relationships between classes. The part at the top already exists; it was defined in the urn:madynes:address:humaninfo namespace in the previous project. The lower part is what we are building up; it will be defined in the urn:madynes:tennis:soft namespace.
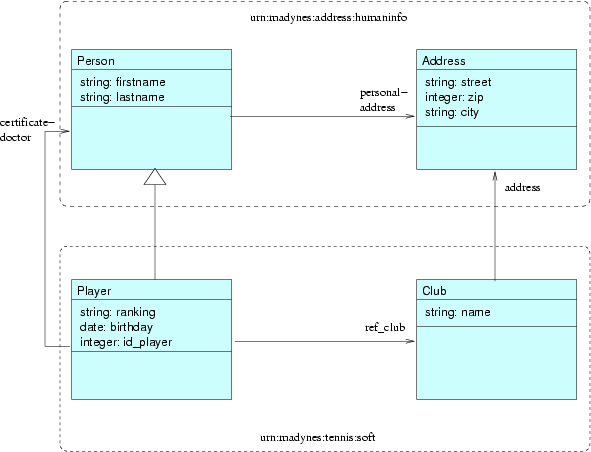
A player inherits from a person and adds a set of new functionalities: a birthday, a ranking, a certifying doctor (who is a person). A player also has a reference to a club, which we define now. A club has a name and an address. This UML shows that we reuse the old object as much as possible. It will be the same in XML schemas. We are going to import the old schema and reuse its components to define the new ones.
The old schema is pretty simple: it defines a complexType addressType which is made of a street, optionally a zip code and a city. A sequence is a series of elements. The <element> must specify its name and its type. For example, street is of type string. XML schemas have some built-in data types like string. Since XML schemas syntax is also defined in a schema (meta), it also belongs to a namespace: http://www.w3.org/2001/XMLSchema. Here, we use a prefix to say which elements or attributes belong to this namepsace: xs:string, xs:element, xs:complexType, ? all have the xs prefix and therefore belong to http://www.w3.org/2001/XMLSchema namespace. How do I know that this prefix relates to that namespace ? Because of this prefix declaration: xmlns:xs="http://www.w3.org/2001/XMLSchema"
<?xml version="1.0" encoding="UTF-8"?>
<xs:schema xmlns:xs="http://www.w3.org/2001/XMLSchema" elementFormDefault="qualified" targetNamespace="urn:madynes:address:humaninfo">
  <xs:complexType name="addressType">
    <xs:sequence>
    <xs:element name="street" type="xs:string"/>
    <xs:element name="zip" type="xs:string" minOccurs="0" maxOccurs="1"/>
    <xs:element name="city" type="xs:string"/>
   </xs:sequence>
  </xs:complexType>

  <xs:complexType name="personType">
   <xs:sequence>
    <xs:element name="firstname" type="xs:string"/>
    <xs:element name="lastname" type="xs:string"/>
    <xs:element name="personal-address" type="addressType"/>
   </xs:sequence>
  </xs:complexType>
</xs:schema>
|
In the second complexType (personType), we define a sub element, personal-address, built from an existing type just defined: addressType. This schema is a bit special because it only defines types, and no root elements.
Here is the document that we would like to have in our new project. It is important to note that the root element tennis belongs to our namespace: xmlns="urn:madynes:tennis:soft". This namespace is propagated to the children until a new namespace is declared. For example, ext:firstname means that firstname belongs to "urn:madynes:address:humaninfo" namespace since it has the prefix "ext".
<tennis xmlns="urn:madynes:tennis:soft"> xmlns:ext="urn:madynes:address:humaninfo"> xmlns:xsi="http://www.w3.org/2001/XMLSchema-instance"> xsi:schemaLocation="urn:madynes:tennis:soft file:tennis.xsd"> xsi:schemaLocation="urn:madynes:address:humaninfo file:humaninfo.xsd">> <players> <player id_player='1' ref_club="1"> ranking="15/2">> <ext:firstname>Vincent</ext:firstname> <ext:lastname>Cridlig</ext:lastname> <ext:personal-address> <ext:street>10 rue des Lilas</ext:street> <ext:city>Marseille</ext:city> </ext:personal-address> <birthday>01/07/1980</birthday> <certifying-doctor> <ext:firstname>Foo</ext:firstname> <ext:lastname>Bar</ext:lastname> <ext:personal-address> <ext:street>10 rue des Bleuets</ext:street> <ext:city>Perpignan</ext:city> </ext:personal-address> </certifying-doctor> </player> <!-- more players here --> </players> <clubs> <club id_club="1">> <name>TCNFH</name> <address> <ext:street>Parc de Loisirs, Impasse des Erables</ext:street> <ext:city>Velaine en Haye</ext:city> </address> </club> <club id_club="2">> <name>TC Heillecourt</name> <address> <ext:street>Zone Industrielle</ext:street> <ext:zip>54180</ext:zip> <ext:city>Heillecourt</ext:city> </address> </club> <!-- more clubs here --> </clubs> </tennis> |
From now, you can rightfully wonder why I choose this structure or another one. When is it better to use attributes or elements ? Here are a set of recommendations (not requirements):
- It is better to use attributes for identifiers because identifiers always have a special role
- It is better to use attributes when the set of values is limited
- corollary: It is better to use elements when the set of possible values is large or infinite
- t is better to use elements for containers (objects containing objects), this is obvious
- id_club and id_player are attributes
- ranking is an attribute because, in tennis in France, the set of possible rankings is finite (30, 15/5, 15/4, ...)
- street is a simpleType element
- ref_club is an attribute since it references a key
Let's write the schema
We choose arbitrarily urn:madynes:tennis:soft for our namespace. We define a prefix tennis , locally, which is a shortcut for urn:madynes:tennis:soft. We also define a prefix, ext, for the existing schema urn:madynes:address:humaninfo.
Since we plan to reuse existing types from the old schema, it is a good idea to import it here. It is required to provide its namespace and its location.
It is usually a good practice to start from small types and then build complex ones on top of the simple ones. Rankings are one of this simple types: it can be defined as a restriction of string type to a set of possible values: NC, 30/5, 30/4, 30/3, ? We call this new type rankingType.
playerType is interesting because it shows how to inherit from existing types. playerType inherits from ext:personType and adds a set of new data. It add birthday and certifying-doctor as elements. Note that the type of certifying-doctor is ext:personType. playerType also adds some new attributes: id_player, ref_club and ranking.
<?xml version="1.0" encoding="UTF-8"?>

<schema xmlns="http://www.w3.org/2001/XMLSchema"
	elementFormDefault="qualified"
	targetNamespace="urn:madynes:tennis:soft"
	xmlns:tennis="urn:madynes:tennis:soft"
	xmlns:ext="urn:madynes:address:humaninfo"
	xmlns:xsi="http://www.w3.org/2001/XMLSchema-instance">

  <import namespace="urn:madynes:address:humaninfo" schemaLocation="humaninfo.xsd"/>

  <simpleType name="rankingType">
      <restriction base="string">
        <enumeration value="NC"/>
        <enumeration value="30/5"/>
        <enumeration value="30/4"/>
        <enumeration value="30/3"/>
        <enumeration value="30/2"/>
        <enumeration value="30/1"/>
        <enumeration value="30"/>
        <enumeration value="15/5"/>
        <enumeration value="15/4"/>
        <enumeration value="15/3"/>
        <enumeration value="15/2"/>
        <enumeration value="15/1"/>
        <enumeration value="15"/>
        <enumeration value="5/6"/>
        <enumeration value="4/6"/>
        <enumeration value="3/6"/>
        <enumeration value="2/6"/>
        <enumeration value="1/6"/>
        <enumeration value="0"/>
        <enumeration value="-2/6"/>
        <enumeration value="-4/6"/>
        <enumeration value="-15"/>
        <enumeration value="-30"/>
      </restriction>
  </simpleType>

  <complexType name="playerType">
    <complexContent>
      <extension base="ext:personType">
        <sequence>
          <element name="birthday" type="string"/>
          <element name="certifying-doctor" type="ext:personType"/>
        </sequence>
    	<attribute name="id_player" type="integer" use="required"/>
    	<attribute name="ref_club" type="integer" use="required"/>
    	<attribute name="ranking" type="tennis:rankingType" use="required"/>
      </extension>
    </complexContent>
  </complexType>

  <complexType name="playersType">
    <sequence>
      <element name="player" type="tennis:playerType" minOccurs="0" maxOccurs="unbounded"/>
    </sequence>
  </complexType>

  <complexType name="clubType">
    <sequence>
      <element name="name" type="string"/>
      <element name="address" type="ext:addressType"/>
    </sequence>
    <attribute name="id_club" type="integer" use="required"/>
  </complexType>

  <complexType name="clubsType">
    <sequence>
      <element name="club" type="tennis:clubType" minOccurs="0" maxOccurs="unbounded"/>
    </sequence>
  </complexType>

  <element name="tennis">
    <complexType>
      <sequence>
        <element name="players" type="tennis:playersType"/>
        <element name="clubs" type="tennis:clubsType"/>
      </sequence>
     </complexType>
  </element>
</schema>
|
More
If you need more, I consider http://www.w3schools.com as a good start for more details.
How to XML with Python
4Suite
Parse XML data from a string
from Ft.Xml import EMPTY_NAMESPACE from Ft.Xml.Domlette import NonvalidatingReader, PrettyPrint, implementation from Ft.Xml.XPath import Evaluate, Compile from Ft.Xml.XPath.Context import Context from Ft.Xml import XPath, EMPTY_NAMESPACE from xml.dom import Node URI = "http://madynes.org" doc = NonvalidatingReader.parseString( """ <rpc message-id='3' xmlns='urn:ietf:params:xml:ns:netconf:base:1.0'> <get-config> <filter> <netconf> <network xmlns="urn:ietf:params:xml:ns:netconf:yencap"> <ifs:interfaces ifs:toto="789" xmlns:ifs="urn:ietf:params:xml:ns:netconf:yencap:module:Interfaces"> <ifs:interface> <ifs:name>eth0</ifs:name> </ifs:interface> </ifs:interfaces> </network> </netconf> </filter> </get-config> </rpc>""" ,URI) |
Parse XML from a file
URI = "http://madynes.org"
doc = NonvalidatingReader.parseUri("file:./tmp.xml", URI)
|
Pretty print a DOM document or a node
PrettyPrint(doc) PrettyPrint(node) |
Build a document from scratch
NS = "urn:ietf:params:xml:ns:netconf:yencap:module:Interfaces"
doc = implementation.createDocument(NS, None, None)
interfacesNode = doc.createElementNS(NS,"interfaces")
textNode = doc.createTextNode("foo")
interfacesNode.appendChild(textNode)
doc.appendChild(interfacesNode)
|
Parse an XML node
# operation here is a node
for child in operation.childNodes:
   if child.nodeType==Node.ELEMENT_NODE:
      if child.tagName == C.SOURCE:
	 for node in child.childNodes:
	    if node.nodeType==Node.ELEMENT_NODE:
	       if node.tagName in [C.RUNNING, C.CANDIDATE, C.STARTUP]:
	          self.source = node.tagName
	       else:
	          return
      elif child.tagName == C.FILTER:
         self.filter = child
	 for att in self.filter.attributes.values():
	    if att.name == "type":
	       if att.value == C.SUBTREE:
	          self.filterType = C.SUBTREE
	       elif att.value == C.XPATH:
	          self.filterType = C.XPATH
|
SUse XPath to select a set of nodes using namespaces
NS_Netconf = "urn:ietf:params:xml:ns:netconf:base:1.0"
NS_YencaP = "urn:ietf:params:xml:ns:netconf:yencap"
NS_Interface_Module = "urn:ietf:params:xml:ns:netconf:yencap:module:Interfaces"
NS_BGP_Module = "urn:ietf:params:xml:ns:netconf:yencap:module:BGP"

NSS = {u"ns": NS_Netconf, u"yp": NS_YencaP, u"ifs": NS_Interface_Module, u"bgp": NS_BGP_Module }
ctx = Context(doc, processorNss = NSS)
nodes = Evaluate(u"//ns:rpc/ns:get-config/ns:filter/ns:netconf/yp:network/ifs:interfaces",ctx)
|
Amara
Parsing
import amara
doc = amara.parse('conf/agents.xml')
for elem in doc.agents.agent:
	print "agent:"
	print elem.ipaddress.type
	print elem.ipaddress
	print elem.publickey.type
	print elem.publickey
|
Editing
e = doc.xml_create_element(u'agent')
f = doc.xml_create_element(u'ipaddress', attributes={u'type': u'4'}, content=u'192.168.0.14')
g = doc.xml_create_element(u'publickey', attributes={u'type': u'rsa'}, content=u'z5er54ze5s54x5fds5df')
e.xml_append(f)
e.xml_append(g)
doc.agents.xml_append(e)

RSA_TYPE = 'rsa'
DSA_TYPE = 'dsa'
IP_VERSION_4 = 4
IP_VERSION_6 = 6
TYPE = 'type'
IPADDRESS = 'ipaddress'
AGENT = 'agent'
PUBLICKEY = 'publickey'

def create_agent(ipaddress, ipaddresstype, publickey, publickeytype):
   e = doc.xml_create_element(u'agent')
   f = doc.xml_create_element(unicode(IPADDRESS), attributes={unicode(TYPE): unicode(ipaddresstype)}, content=unicode(ipaddress))
   g = doc.xml_create_element(unicode(PUBLICKEY), attributes={unicode(TYPE): unicode(publickeytype)}, content=unicode(publickey))
   e.xml_append(f)
   e.xml_append(g)
   doc.agents.xml_append(e)

print doc.xml()
|
How to cook YencaP Modules
Automatic module skeleton generator
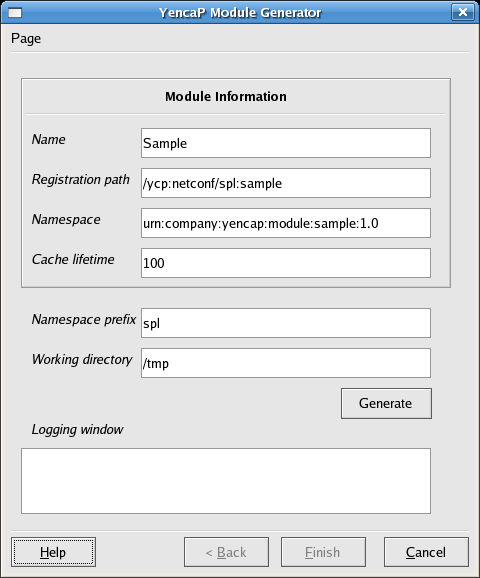
We now provide a very simple GUI to create new modules. See Helper Sources. It is based on Qt library. Feedback or patchs are welcome!!
Download
- Go to Helper sources
- Click on anonymous access
- Open with javaws. The location is plateform dependant, for example: /usr/java/jdk1.5.0_06/jre/bin/javaws
- Choose a base path like /tmp/helper (the directory must exist)
- Leave login and password unchanged
- Go to /tmp/helper and run python app.py
Screenshot
In the example, we create a Sample module. The module directory will be generated in /tmp/Sample_Module and will contain:
- Sample_Module
- __init__.py file
- Sample_Module.py file
- a readme file for help
This directory must be copied in ${YENCAP_HOME}/Modules
Module by hand
I assume that yencap is downloaded and unzipped in ${YENCAP_HOME} directory. The first thing to do is to find a name for your module. Let's say "MyModule". This name will be reused many times by YencaP to load the module and find the paths and classes.
Update modules.xml
modules.xml file stores a set of information related to modules. This file is located in ${YENCAP_HOME}/conf/modules.xml. To register your module, append a new module element to the "modules" element:
<?xml version="1.0" encoding="UTF-8"?>
<modules xmlns:ycp="urn:loria:madynes:ensuite:yencap:1.0"
        xmlns:ifs="urn:loria:madynes:ensuite:yencap:module:Interfaces:1.0"
	xmlns:my="urn:loria:madynes:ensuite:yencap:module:MyModule:1.0">
  <module>
    <name>Interfaces</name>
    <xpath>/ycp:netconf/ycp:network/ifs:interfaces</xpath>
    <namespace>urn:loria:madynes:ensuite:yencap:module:Interfaces:1.0</namespace>
    <cache-lifetime>10000</cache-lifetime>
  </module>
  <module>
    <name>MyModule</name>
    <xpath>/ycp:netconf/ycp:sample/my:mymodule</xpath>
    <namespace>urn:loria:madynes:ensuite:yencap:module:MyModule:1.0</namespace>
    <cache-lifetime>1000</cache-lifetime>
  </module>
</modules>
|
There are four parameters to set in the module element:
- name: the name of your module
- xpath: the location where your module data will be attached in the XML configuration
- namespace: the namespace of your module
- cache-lifetime: the time of validity of the data in milliseconds. YencaP stores a cache of the modules data. When the timer is over, the data is removed from memory. This parameter applies for the running configuration.
The last step is to declare the namespace and a prefix in the root element. This is necessary for YencaP to resolve your registered xpath. The prefix name is a local variable. Afterwards, when you send a get-config request (for example), you can choose a different prefix, but the namespace must match.
Then, you are done with the modules.xml file.
Making the module itself
Go to ${YENCAP_HOME}/modules directory. The subdirectories are the YencaP modules: RBAC, Interfaces, BGP, Asterisk…
cd ${YENCAP_HOME}/modules

# Create a new directory with the name of your module:
mkdir MyModule

# Change to the new directory:
cd MyModule

# Create a file that says you are doing a python package:
touch __init__.py

# Create the main file of your module. The name must match the module name and finish with "_Module":
touch MyModule_Module.py
|
Edit the main module file
First of all, every module class must inherit from the Module class located in ${YENCAP_HOME}/modules/module.py. When the module is loaded by YencaP, it will set some attributes inside the MyModule class. These attributes are read from the modules.xml file:
- self.name
- self.path
- self.namespace
- self.cacheLifetime
The Module class defines a set of Netconf operations that the class MyModule has to implement:
- get
- getConfig
- copyConfig
- editConfig
- rollBack
When the module has processed an operation, it must return a ModuleReply.
from Modules.module import Module from Modules.modulereply import ModuleReply from Ft.Xml.Domlette import NonvalidatingReader, implementation, PrettyPrint from Ft.Xml.XPath.Context import Context from Ft.Xml import XPath, EMPTY_NAMESPACE from xml.dom import Node from Ft.Xml.XPath import Evaluate import string class MyModule_Module(Module): def __init__(self, name, path, namespace, cacheLifetime, parameters): """ Create an instance and initialize the structure needed by it. @type parameters: dictionary @param parameters : should be a dictionary containning the follow keys """ Module.__init__(self, name, path, namespace, cacheLifetime) |
Guideline
Making a data model for Netconf
When doing an XML data model, it is preferable to use existing tools such as XML Schema definitions. In future versions of EnSuite, it could become mandatory to provide such a schema. It will allow YencaP to validate the structure of incoming or outgoing configurations.
One problem regarding Netconf is that, the more elements you define, the more possible operations you will have to deal with. For each XML element, you potentially have to manage 4 edit-config sub operations : merge, create, delete, replace. That's a lot of cases.
| MERGE | CREATE | DELETE | REPLACE | |
| element1 | search with the key if exists then merge | search with the key if exists then create | search with the key if exists then delete | search with the key if exists then replace |
| element2 | search with the key if exists then merge | search with the key if exists then create | search with the key if exists then delete | search with the key if exists then replace |
| element3 | search with the key if exists then merge | search with the key if exists then create | search with the key if exists then delete | search with the key if exists then replace |
| ... | ... | ... | ... | ... |
We advice consideration of the use of attributes. Attributes not only reduce the cost of implementations but also improve the readability of XML data.
For example, in the RIP_Module, we chose:
<kernel metric="1" route-map="1"/> |
<kernel> <metric>1</metric> <route-map>1</route-map> </kernel> |
How to cook YencaP Operations
It is likely that most new capabilities will, in fact, be new operations. At least, it is one of the possibilities. Therefore, YencaP provides an easy way to build new operations. The way it works is pretty similar to the way you add new modules. I assume that you unpack YencaP in the ${YENCAP_HOME} directory.
Registering a new operation
As for the modules, the first thing to do is to choose a name for our
new operation. Let's choose "reboot". In order to register the operation,
it is required to edit the ${YENCAP_HOME}/conf/operations.xml file.
Add a new
<?xml version="1.0" encoding="UTF-8"?>
<operations>
        <operation>
                <name>get-config</name>
                <mainFileName>base.get_config_operation</mainFileName>
                <className>Get_config_operation</className>
        </operation>
       [...]
        <operation>
                <name>reboot</name>
                <mainFileName>ext.reboot_operation</mainFileName>
                <className>Reboot_operation</className>
        </operation>
</operations>
Implementing the "reboot" operation
The "Reboot_operation" must inherit from the Operation class, which is located in ${YENCAP_HOME}/Operations/operation.py. It must implement the three following methods:
- __init__ is the constructor of the class
- setParameters() allows you to extract the parameters (source, target or whatever) from the operation node
- execute() do the operation itself and must return an OperationReply instance
<reboot> <option>saveBeforeShutingDown</option> </reboot> |
from Operations.operation import Operation from Operations.operationReply import OperationReply import [...] class Reboot_operation(Operation): """ Concrete command (see command design pattern) for the reboot operation. """ def __init__(self): """ Constructor of a Get_config_operation command. """ # Default behavior self.option = "saveBeforeShutingDown" def execute(self): """ Execute the get-config operation. """ # Do the job self.rebootTheDevice() if self.operationReply.isError(): return self.operationReply def setParameters(self, operation, NSS = None): """ Set the source and filter parameters @type operation: Node @param operation: The operation node of the current Netconf request. """ self.prefixes = NSS for child in operation.childNodes: if child.nodeType==Node.ELEMENT_NODE: if child.tagName == "option": for node in child.childNodes: if node.nodeType==Node.TEXT_NODE: self.option = node.nodeValue |
We recommend the use of a Command Design Pattern to implement the system operations. It will make it easier to implement the "rollback()" method. See the Interfaces module for more details.
