YencaP User Guide
Installing YencaP
Fedora Core 5 and 6
Package requirements
All the following packages are available with the default Fedora repositories. It is strongly recommended to use yum or yumex in Fedora. It will solve all the package dependencies and install everything automatically.
| PACKAGE | VERSION |
| python-4Suite-XML | 1.0-rc4 |
| python-amara | 1.1.7 |
| python-paramiko | 1.6.1-1 |
| PyXML | 0.8.4 |
| quagga | 0.98.6-1 |
| libxml2-python | 2.6.23 |
Install command
The following command installs yencap and all its dependencies if needed.
| yum install yencap-${version}.rpm |
Uninstall command
| yum remove yencap |
Debian
Pachage requirements
Here is the list of required packages:
| PACKAGE | VERSION |
| python2.4 | >=2.4.1-2 |
| python2.4-dev | >=2.4.1-2 |
| python-paramiko | >=1.5 |
| python2.4-pyopenssl | |
| python2.4-crypto | >=2.0.0 |
| libxml2 | >=2-2.6.19-1 |
| libxml2-dev | >=2-2.6.19-1 |
| python2.4-libxml2 | >=2-2.6.19-1 |
| python2.4-xml | >=0.8.4-1 |
| python2.4-4suite | >=0.99 |
Install command
| apt-get install yencap-${version}.deb |
Uninstall command
| apt-get remove yencap |
Mandriva
Pachage requirements
To install Ensuite in Mandriva Linux 2006, you must install the following packages:
- python-2.4.1-3mdk
- libpython2.4-devel-2.4.1-3mdk
- libpython2.4-devel-2.4.1-3mdk
- libpython2.4-2.4.1-3mdk
- pycrypto-2.0-1mdk
- PyXML-0.8.4-1mdk
- ibxml2-python-2.6.21-3mdk
- ibxml2-2.6.21-3mdk
- ibxml2-devel-2.6.21-3mdk
Other required packages have to be installed (as root) manually:
- paramiko 1.5.2 (http://www.lag.net/paramiko)
- To install, unpack the 'paramiko-1.5.2.zip' file.
- Run the 'python2.4 setup.py install' command
- 4suite (http://4suite.org/index.xhtml)
- To install, unpack the '4Suite-XML-1.0b3.tar.gz' file.
- Run the 'python2.4 setup.py install' command
Install command
Uninstall command
From tar.gz (all distributions)
Preliminaries
To install YencaP:
- download the files: 'yencap-version.tar.gz' from the download section
- unpack the 'yencap-version.tar.gz', and run
Install command
| make install |
Uninstall command
| make uninstall |
Installation paths
Source files are installed, by default, in:
- /usr/local/ensuite/yencap
- /usr/local/ensuite/yencap-manager
- etc/ensuite/yencap
- /etc/ensuite/yencap-manager
Starting YencaP
How to start YencaP?
su /etc/init.d/zebra start /etc/init.d/bgpd start /etc/init.d/ripd start /etc/init.d/yencap start |
How to stop YencaP?
su /etc/init.d/yencap stop |
How to restart YencaP?
su /etc/init.d/yencap restart |
Configuring YencaP
The installation of Ensuite should have everything working fine. However configuration is needed in order to customize EnSuite to specific needs. We therefore provide a quick overview of the main configuration files:
- netconfd.xml : the main YencaP configuration file
- modules.xml : the description of modules
- rbac.xml : the access control policy
YencaP Data Model
Introduction
In order to provide flexibility, the YencaP data model is split into modules. Each module is responsible for a sub-part of the YencaP data model and follows a generic API provided by the Module class in order to be incorporated into YencaP.
The YencaP data model is compliant with Yang data modeling language. A YencaP module should be described by a Yang module.

Existing Modules
A set of modules is natively included into YencaP. Not all of them support all Netconf operations.
For example, IPsec only supports get-config. We encourage motivated developers to contribute
and complete the existing modules or create new ones.
- with Yang data modelwithout Yang data model (will have one)
- A good practice when creating some YencaP modules is to provide an Yang module in order to describe the expected data model. This will be a requirement in future versions of YencaP.
- Start from an existing module and modify it according to your needs. It avoids a lot of small problems, like forgetting __init__.py files or bypassing YencaP conventions.
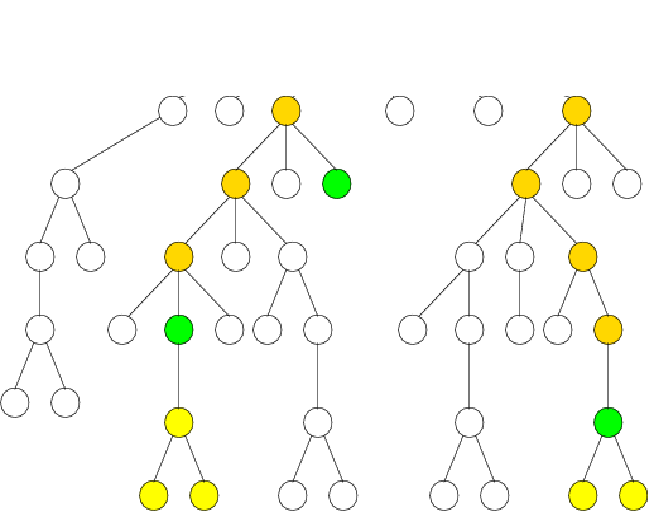
- for each selected node, the whole subtree is added to the result (yellow nodes)
- for each selected node, the parents are added to the result but not the children of the parents (gold nodes)
Here's two tutorials on the Asterisk and BGP modules in YencaP: Asterisk_yencap_module.pdf and BGP_yencap_module.pdf.
Data Model Extension Good Practices
About Filtering
Conceptual view
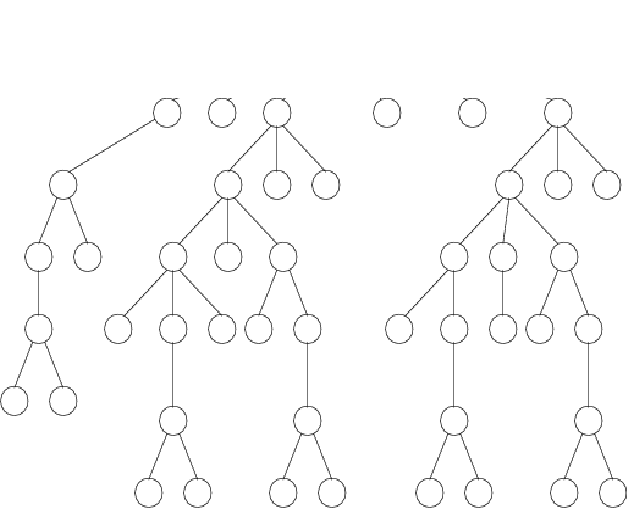
The following picture shows the tree representation of an XML configuration:

When the agent receives a get-config with XPath, it applies the XPath request on this tree. The result is a set of selected nodes which are displayed in green in the following schema. YencaP does not reply with this set of nodes to the client, but rather builds a filtered copy of the initial tree. In order to do that, YencaP propagates the selected nodes according to the following rules:

The result contains all these selected nodes (green, gold, yellow). All the other nodes are removed from the result (more precisely, are not added to the result).

The process is the same as for access control. The authorized scopes are expressed as XPath expressions. When a user activates a role, she receives a set of authrozized scopes. All the authorized scopes of this user are stored in a list of Xpath expressions. Then, these expressions are applied on the previous result document in order to filter the document again.
Internal Algorithm

